How to upload sprinter to Printrboard
Sprinter config setting:
Sprinter Sprinter: Supported, use MOTHERBOARD == 9.
Setting Arduino for Printrboard:
The teensyduino libraries for Arduino here: http://pjrc.com/teensy/td_download.html
Step 1: Download and install Teensyduino
Teensyduino was created by PJRC for their Teensy line of boards. Teensy is a great alternative to Arduino if you want an ultra compact board with built in USB. The Teensy++ happens to also use the AT90USB1286, so it’s compatible w/ Printrboard/Teensylu. Follow PJRC’s instructions for installation from the download link.
If you only plan to program for RepRap, you don’t need to install any of the libraries. On Windows, you will be prompted to install the serial driver. Select yes. You don’t have to worry when Windows complains that the driver is unsigned… it’s just an INF file to tell Windows to use one of its own built-in drivers.
Step 2: Modify Teensyduino Configuration for use with USBtinyISP
Download at90usb1286txt.zip.
Navigate to where your Arduino files are located. On my computer, I have them in d:\arduino-0022. We will call this <arduinofolder>. Now, find the subfolder where the Teensyduino library was installed:
<arduinofolder>\hardware\teensy
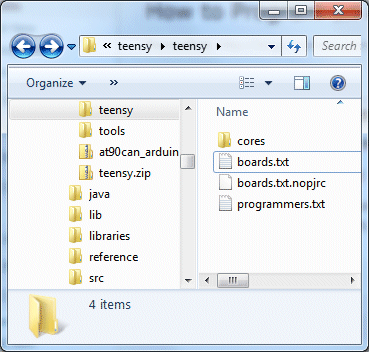
If you are in the correct folder, you should already see a boards.txt and a subfolder called core in there. Drop the files from at90usb1286txt.zip into that folder, overwriting the existing boards.txt. You should see something like this:
If you don’t plan to develop with any of PJRC’s Teensy or Teensy++ boards, you can keep them from showing up in your Arduino menu by copying boards.txt.nopjrc over boards.txt.
Now, when you start Arduino, you should see some new configurations in the Tools->Board menu. The important ones are:
[usbtinyisp]AT90USB1286
[usbtinyisp]Teensylu/Printrboard
[BootloaderCDC]AT90USB1286
[BootloaderCDC]Teensylu/Printrboard
Step 1: Download and install Teensyduino
Teensyduino was created by PJRC for their Teensy line of boards. Teensy is a great alternative to Arduino if you want an ultra compact board with built in USB. The Teensy++ happens to also use the AT90USB1286, so it’s compatible w/ Printrboard/Teensylu. Follow PJRC’s instructions for installation from the download link.
If you only plan to program for RepRap, you don’t need to install any of the libraries. On Windows, you will be prompted to install the serial driver. Select yes. You don’t have to worry when Windows complains that the driver is unsigned… it’s just an INF file to tell Windows to use one of its own built-in drivers.
Step 2: Modify Teensyduino Configuration for use with USBtinyISP
Download at90usb1286txt.zip.
Navigate to where your Arduino files are located. On my computer, I have them ind:\arduino-0022. We will call this <arduinofolder>. Now, find the subfolder where the Teensyduino library was installed:
<arduinofolder>\hardware\teensy
If you are in the correct folder, you should already see a boards.txt and a subfolder called core in there. Drop the files from at90usb1286txt.zip into that folder, overwriting the existing boards.txt. You should see something like this:
If you don’t plan to develop with any of PJRC’s Teensy or Teensy++ boards, you can keep them from showing up in your Arduino menu by copying boards.txt.nopjrc overboards.txt.
Now, when you start Arduino, you should see some new configurations in the Tools->Board menu. The important ones are:
[usbtinyisp]AT90USB1286
[usbtinyisp]Teensylu/Printrboard
[BootloaderCDC]AT90USB1286
[BootloaderCDC]Teensylu/Printrboard
Using Arduino and micro USB to upload sprinter:
- Choose [BootloaderCDC]Teensylu/Printrboard from the Arduino Tools–>Board menu, and select the COM port associated with your Printrboard’s bootloader. SeeLincomatic’s How to Program an AT90USB1286/Teensylu/Printrboard with Arduino article for help configuring Arduino.
- Click File –> Upload to Board.
- Arduino will compile and upload firmware. You should see an error a few seconds after the firmware compiles. This is because the AT90USB has successfully exited the bootloader.
- Press Reset. You may need to disconnect and reconnect the USB and power cables.
